After you successively remove Camtasia Studio 8, much disk space will be freed up, because it’s a relatively large program to uninstall. Here is a brief introduction of the program:
Camtasia Studio is a recording and video editing software. It helps you quickly create professional quality videos and share them with anyone, on nearly any device without formal training. When you need to train an audience, give a presentation, explain an idea, share knowledge, or offer feedback, Camtasia Studio can make it easy.
If you’re wondering what alternatives you can have after you remove Camasia Studio 8, read the list of recommended video editing software in 2016. Their features are surely not the same, but can be much cheaper than you think.

How To Remove Camtasia Studio 8 Yourself
Here is the most complete manual instruction to go through. I’m listing all the steps including the necessary and the optional, and you take what you need to take depending on your situation.
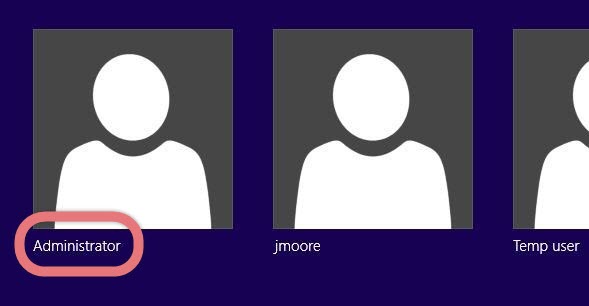
1. Administrative account.
In most cases we log in the operating system as an Administrator, which allows the user to make changes without being asked for password permission. If you don’t know whether you’re logging in as an Administrator, just continue and you will find out.
Need another Administrator? See How to enable the built-in Administrator account in Windows 7/8/10.
2. Shut down Camatasia Studio 8.
Some programs will automatically close or ask you to shut them down during the removal, while some will not. To better remove Camtasia Studio 8, shut down the program and the related possesses that are running in the background before actual removal.
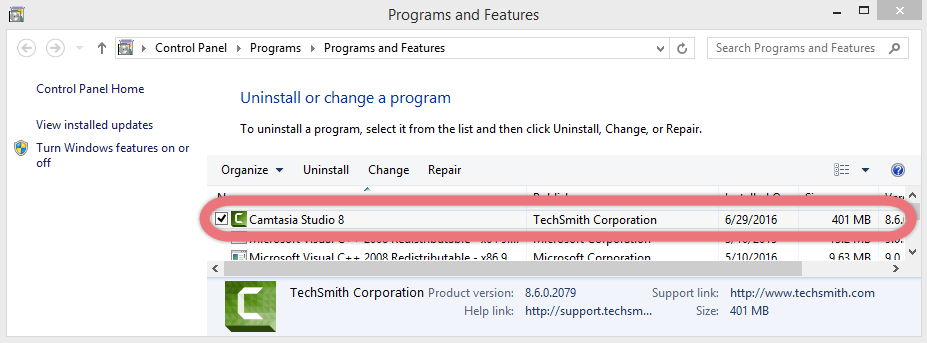
3. Remove Camtasia Studio 8 through the Control Panel.
In the bottom-left corner of your screen, click on the Start button, click the Down arrow to view the Apps screen, locate Camtasia Studio, right-click on it and select Uninstall.

Then you see the list which tells you what programs are installed on your PC, the names of them, when they’re installed, and how much disk space they’re taking. Locate & double-click Camtasia Studio 8 to activate its built-in uninstaller.
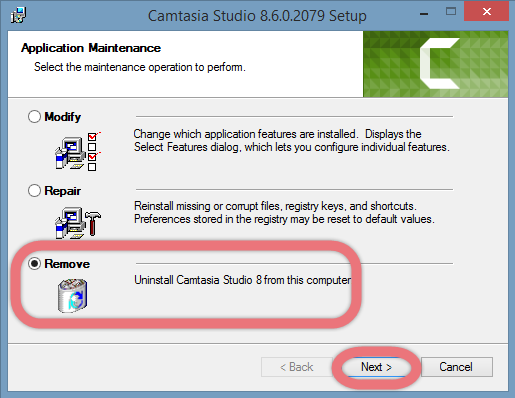
4. Follow the prompts to proceed and confirm the removal.
Once its built-in uninstaller pops up, click Next and select the Remove option to provide confirmation. Wait until the uninstaller finishes its job, and move on to the next steps to search for the related lingering files.
5. Back up the Registry (Optional but suggested).
This is a precaution — if you accidentally delete anything that isn’t supposed to be deleted, you’ll have a full back-up copy to restore the data.
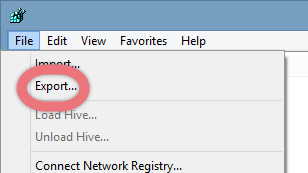
Hover your mouse in the bottom-right corner to see the charms bar, select Search, then enter “regedit” to open the Registry Editor. > On the navigator click File > Export…, type a name for the back-up copy and save it to your selected location (How to Backup and Restore the Registry in Windows 7/8/10?).
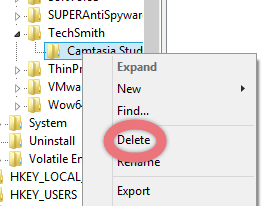
6. Remove Camtasia Studio 8 from Registry Editor.
During installation the program puts its entries/keys in the Registry, so that it can be connected to the whole system. That’s why sometimes you can’t run a program by simply coping the folder from somewhere else. And this step is to delete the entries of Camtasia Studio 8.
Hover your mouse in the bottom-right corner to see the charms bar, select Search, then enter “regedit” to open the Registry Editor. > Navigate with the left column explorer to the following locations, and right-click on the corresponding folder to delete these folders:
- HKEY_CURRENT_USER\Software\TechSmith\Camtasia Studio\
- HKEY_LOCAL_MACHINE\SOFTWARE\TechSmith\Camtasia Studio\
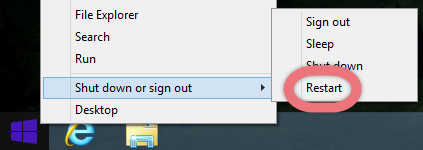
7. Restart your PC to completely remove Camtasia Studio 8 (Advised).
Is it necessary? Yes and no. When you install/remove Camtasia Studio 8, it will register or unregister the usage of one or more .dll files. And when you choose to reboot your computer after uninstalling a program, Windows will close the program & delete any file that is no longer assigned to a program to clean up the computer.
Not every program’s removal requires a reboot, but I think it would be better to follow the general idea.
How Special Uninstaller Helps You Remove Camtasia Studio 8
1. Run Special Uninstaller after installation, you can see what programs are currently installed on your computer.
2. Select Camtasia Studio 8 in the list, and click “Run Uninstaller.” It will scan all the related files and get ready for your next request, during which you may be asked for confirmation of this removal, just click “Next” to proceed.

3. Click “Scan Leftovers” when it turns to blue, then you can see all the related vestiges that regular removal might left behind. Click “Delete Leftovers” to completely remove Camtasia Studio 8.
In the last clicking Back will return you to the list of the installed programs, where you can check if your target has been eliminated. View this short video to take a quick view on how it works:
How to Uninstall FL Studio 12 How to Uninstall RealDownloader
Leave a Reply