To completely remove PC Cure Pro, there might be something you need to know. Just read the page for all the useful information you can get.

PC Cure Pro is a cleanup and optimization utility designed for Windows OS. It can refresh and tune your PC for better performance, and claims to keep it clean and run like new. If you don’t need this program now and you are looking for solutions to completely uninstall it, continue you reading here.

Remove PC Cure Pro with a Light but Powerful Helper
Using Special Uninstaller will save you a lot of time, better ensuring a complete removal for the program you wish to remove.
Here are video demonstration & specific procedures of how to remove SoundTap:
Step 1. Click any of the blue download buttons on this page or visit the homepage to download Special Uninstaller.
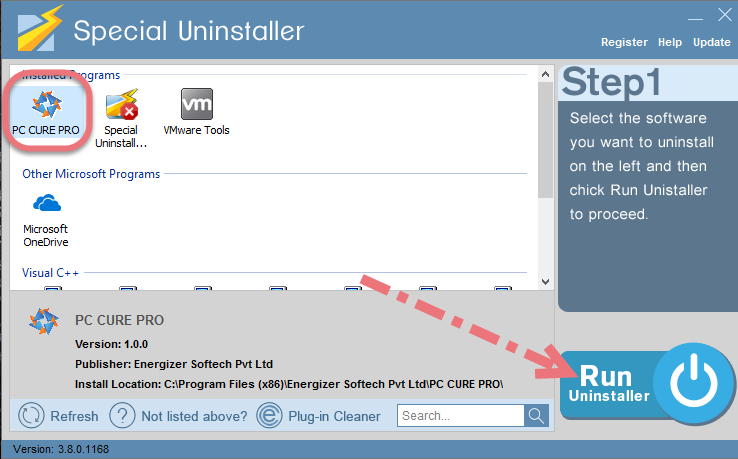
Step 2. Run it, and you can see clearly what programs are installed currently. Choose PC Cure Pro and click Run Uninstaller.
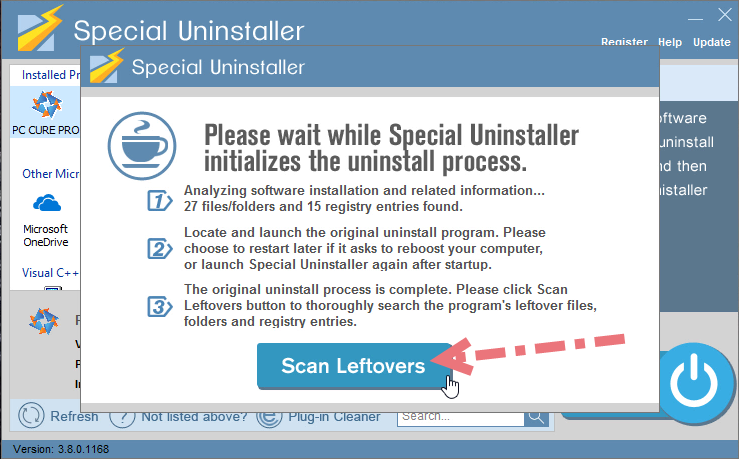
It will scan for all the related files and get ready for your next request, during which you may be asked for confirmation of this removal, just click Yes/OK to proceed.
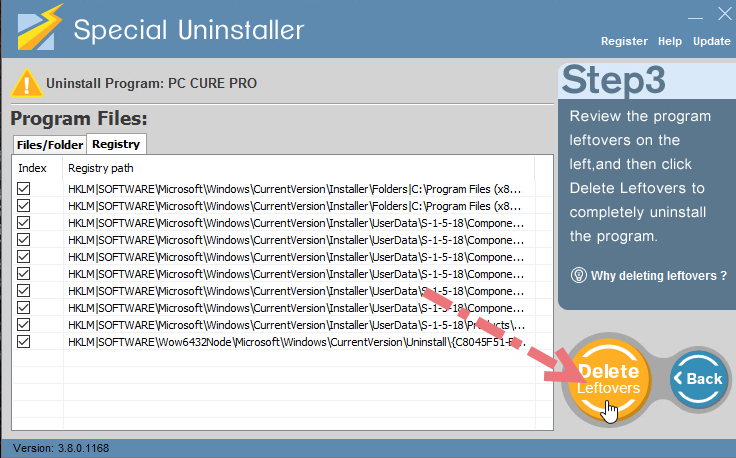
Step 3. Click Scan Leftovers when it turns to blue, then you see the all the vestiges that most users will forget to delete during the manual removal. Click Delete Leftovers to fully remove PC Cure Pro.
Step 4. Clicking Back to refresh the list of currently installed programs, and check whether your target has gone.

You can perform the same steps to remove other unwanted programs on your computer. I do hope this recommendation can be a better removal solution to you anytime. To learn the manual removal way, continue your reading under the next subtitle.
How to Remove PC Cure Pro Yourself
Here I have provided very detailed manual instruction to go through in Windows. I have listed all the steps including the necessary and the optional, and you take what you need to take depending on your situation. Since operations in Windows 8/10 are almost the same, so I’m not going to separately write two parts.
Step 1. Administrative right.
In most cases we log in the operating system as an Administrator, which allows the user to make changes without being asked for password permission. If you don’t know whether you’re logging in as an Administrator, just continue and you will find out.
Step 2. Shut down PC Cure Pro (Optional).
Some programs will automatically close or ask you to shut them down during the removal, while some will not. To better remove PC Cure Pro, shut down the program and the related possesses that are running in the background before actual removal. There are two places to check:
System Tray: Right-click the icon and select Quit.
Task Manager: press & hold Ctrl + Alt + Del to open, then close/end everything related to PC Cure Pro.
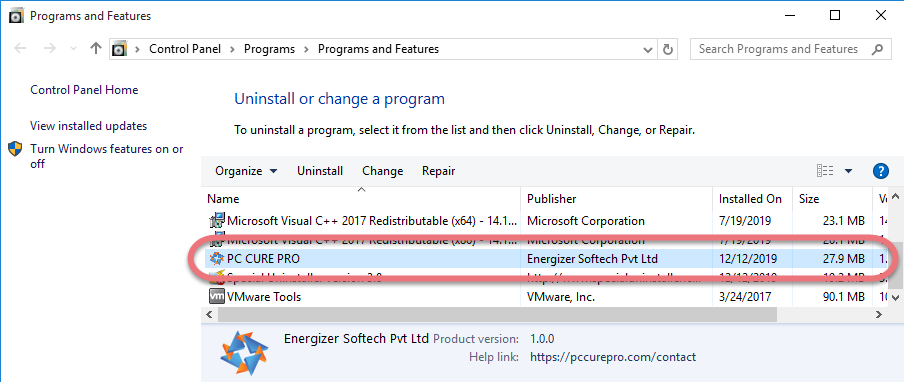
Step 3. Remove PC Cure Pro through the Programs and Features.
In the bottom-left corner of your screen, right-click the Windows logo and select Programs and Features.
Then you see the list which tells you what programs are installed on your PC, the names of them, when they’re installed, and how much disk space they’re taking. Locate & double-click PC Cure Pro to activate its built-in uninstaller.
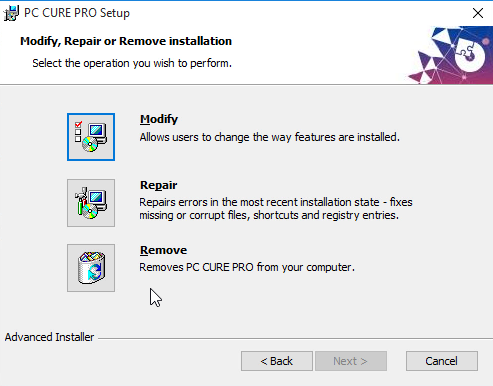
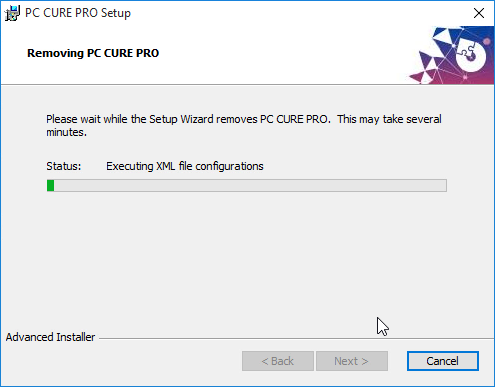
Step 4. Follow the prompts to proceed with the removal.
When it says “Welcome to the PC CURE PRO Setup Wizard,” click Next. And When you’re presented with three options, select the last one – Remove. When it finishes the process, click Finish.

Step 5. Back up the Registry (Optional).
This is a precaution — if you accidentally delete anything that isn’t supposed to be deleted, you’ll have a full back-up copy to restore the data.
Hover your mouse in the bottom-right corner to see the charms bar, select Search, then enter “regedit” to open Registry Editor. > On the navigator click File > Export, type a name for the back-up copy and save it to your selected location.
Step 6. Remove PC Cure Pro from Registry Editor.
During installation the program puts its entries/keys in the Registry, so that it can be connected to the whole system. That’s why sometimes you can’t run a program by simply coping the folder from somewhere else. And this step is to delete the entries of PC Cure Pro.
Hover your mouse in the bottom-right corner to see the charms bar, select Search, then enter “regedit” to open Registry Editor > Delete these two folders:
- HKEY_CURRENT_USER\Software\Energizer Softtech Pvt Ltd\
- HKEY_LOCAL_MACHINE\SOFTWARE\Energizer Softtech Pvt Ltd\
Step 7. Restart your PC to completely remove PC Cure Pro (Advised).
When you install/remove PC Cure Pro, it will register or unregister the usage of one or more .dll files. And when you choose to reboot your computer after uninstalling a program, Windows will close the program & delete any file that is no longer assigned to a program to clean up the computer. Not every program’s removal requires a reboot, but I think it would be better to follow the general idea.
Leave a Reply