On this page you will find specific solutions to remove FlashGet in Windows. For any problems you encounter during the removal, feel free to leave comments at the end of the page.
Most of the time, we uninstall unwanted programs with the built-in Add/Remove Programs utility or the program’s default uninstaller. But sometimes this just doesn’t work, they may still function well like a stubborn element after you reboot your computer. In case users perform anything incorrectly, we have listed every step with details, hopefully you can successfully, smoothly remove FlashGet this time!

How to Remove FlashGet Step by Step?
1. Exit the FlashGet program.
Most programs will automatically close or ask you to shut them down during the removal, while a few will not. To ensure a complete, smooth removal, better shut down the program as well as the related possesses that are running in the background before activating its built-in uninstaller. You can do this through the System Tray and Task Manager.
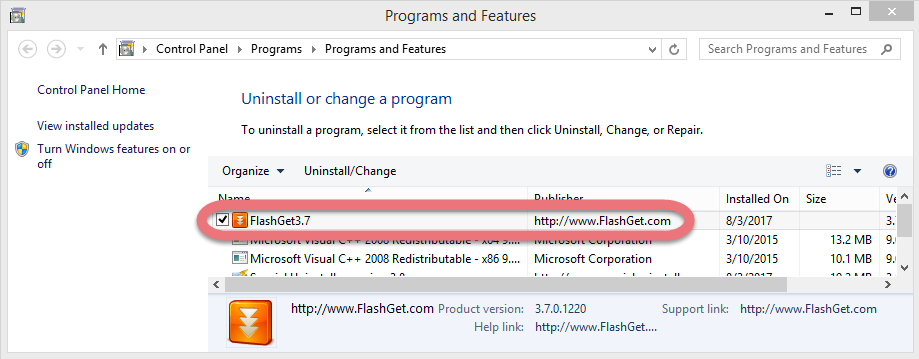
2. Locate FlashGet in the Programs list.
Windows 8 (Start screen): Click on the Start button, click the Down arrow, find FlashGet in the Apps list, right-click on it and select Uninstall at the bottom.
Windows 10 (Start menu): Right-click on the Start button, select Programs and Features, and locate FlashGet in the list.
3. Remove FlashGet in the Programs List.
Now you should be looking at the Program List, which tells you what programs are installed on your PC, the names of them and their publishers, when they’re installed, and how much disk space they’re taking. Double-click FlashGet to activate its built-in uninstaller.
4. Follow the instruction to proceed and confirm the removal.
Once its built-in uninstaller pops up, click Next/Yes to provide confirmation. Wait until the uninstaller finishes its job, and move on to the next steps to search for the related lingering files. If you’re prompted to restart, do it right away or later, no big deal.
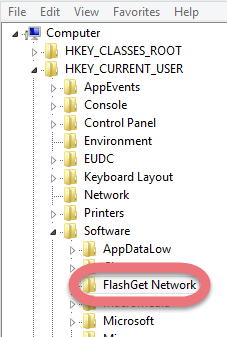
5. Remove FlashGet from Registry Editor.
During installation the program registers itself in the system, that’s why you can find their entries in the Registry, it also explains why sometimes you can’t run a program by simply coping the folder from somewhere else. This step is to delete the entries of FlashGet. But you should know that using the Registry Editor incorrectly can cause serious issues and may result in an inoperable operating system. So don’t delete anything wrong.
Windows 8 (Start screen): Press and hold the Windows key + C to open the Charms, select Search, type “FlashGet” in the field, and click the result to open the Registry Editor. Then check for the following folders with the left column explorer, if found, right-click on the them and select Delete to completely remove FlashGet.
- HKEY_CURRENT_USER\Software\FlashGet Network\
Windows 10 (Start menu): Execute “regedit” in the search input field on the taskbar to open the Registry Editor. Then check for the following two folders with the left column explorer, if found, right-click on the them and select Delete to completely remove FlashGet:
- HKEY_CURRENT_USER\Software\FlashGet Network\
6. Restart the computer (Suggested).
When you install/remove FlashGet, it will register or unregister the usage of one or more .dll files. And when you choose to reboot your computer after uninstalling a program, Windows will close the program & delete any file that is no longer assigned to a program to clean up the computer. Not every program’s removal requires a restart, but I think it’s the best to follow the general idea.
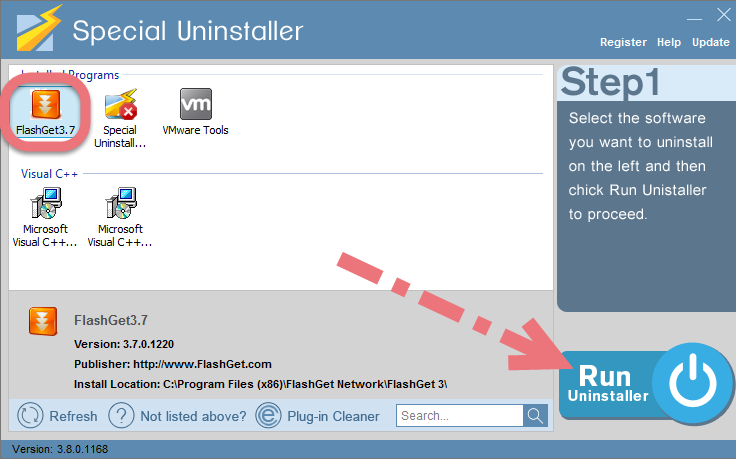
Easily, Quickly Remove FlashGet with Special Uninstaller
This method applies to all the popular Windows systems, saving troubles and possible risks during the conventional removal. The following short video will give you a quick view of how it works:
Then here are the steps:
1.Download & install Special Uninstaller.
Click any of the blue download buttons on the page to download & install Special Uninstaller, then run it.
2. Remove FlashGet.
Select FlashGet in the Programs list, and click Run Uninstaller, follow the on-screen instructions of proceed and confirm the removal.
3. Delete the registry entries.
Click Scan Leftovers, and you will see a list of deleting files and registry entries (leftovers) of the program. You can review the list for details including their names and locations, then hit Delete Leftovers to fully remove FlashGet.
Clicking Back will bring you back to the list of currently installed programs, so that you can check whether the uninstall was successful.
I need to uninstall Security Essentials I need to uninstall Spybot Search & Destroy
Leave a Reply