Lately some users have been asking how to correctly remove Spybot Search & Destroy in Windows, so we’re writing solutions on this page to provide help.
If any file of Spybot Search & Destroy is missing and you’re not able to perform the removal, download it here and following the instructions to fix the problem.

Manually Remove Spybot Search & Destroy in Windows
The removal steps I listed can be performed in both Windows 8 (Start screen) & Windows 10 (Start screen/Start menu). In case some users still haven’t figured out how to change the Start screen into the Start menu in Windows 10:
1. Go to Start > Settings command.
2. At the Settings window, click the setting for Personalization.
3. At the Personalization window, click the option for Start.
4. In the right pane of the screen, the setting for “Use Start full screen” is turned on. Just turn it off.
5. Click the Start button, and you should see the Start menu. 🙂
Now let’s see how to correctly remove Spybot Search & Destroy from your computer:
1. Close the program first.
- Check the System Tray in the bottom-right corner of your screen, right-click the program icon and select Exit.
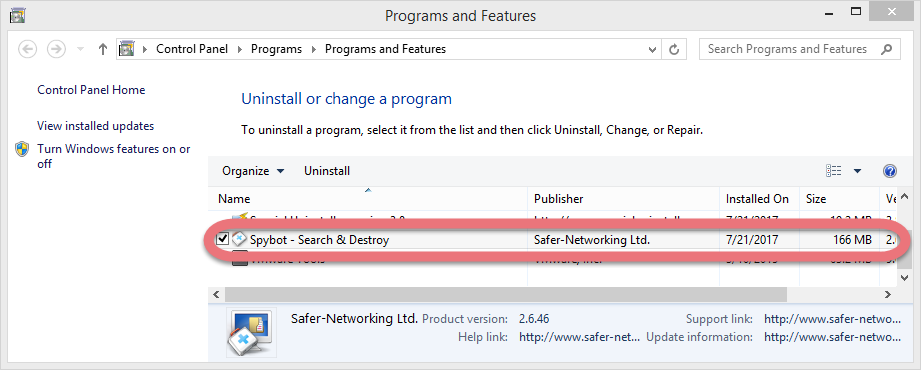
2. Remove Spybot Search & Destroy via the programs list.
To do it via the Start screen:
- In the bottom-left corner of your screen, right-click the Start button.
- Click Programs and Features.
- Find Spybot Search & Destroy and double-click it to activate the built-in uninstaller.
To do it via the Start menu:
- In the bottom-left corner of your screen, click on the Start button and select Settings.
- Click System > Apps & Features.
- Select Spybot Search & Destroy and click Uninstall > Uninstall.
3. Follow the prompts to proceed.
- When you see the uninstall wizard pop up, click Next to proceed.
- If you don’t want to inform the developer why you’re uninstalling it, leave it blank and click Uninstall.
- Wait for the built-in uninstaller to finish its job.
- Click Yes to restart your PC right away or click No to restart it later.
4. Delete the leftovers of Spybot Search & Destroy from the hard disk.
- Here are the folders to delete:
C:\Program Files (x86)\Spybot – Search & Destroy
C:\ProgramData\Spybot – Search & Destroy (Please note the Program Data folder is Hidden)
5. Remove Spybot Search & Destroy Entries via the Registry Editor
Please be sure you have removed all the programs related to Spybot Search & Destroy, otherwise just skip Step1 and directly reboot your PC if you haven’t done it.
To do it via the Charms bar:
- Press Windows + C on your keyboard at the same time to open the charms bar, and select Search.
- Enter “regedit” in the box to open the Registry Editor.
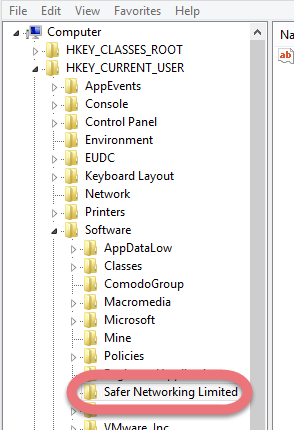
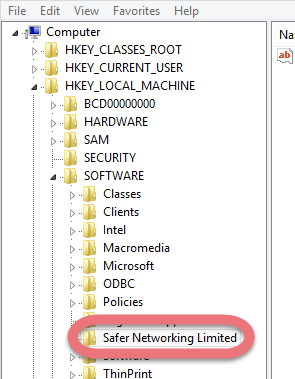
- Delete the following folders:
HKEY_CURRENT_USER\Software\Safer Networking Limited\
HKEY_LOCAL_MACHINE\SOFTWARE\Safer Networking Limited\
- On the navigator, click Edit > Find…, and enter “Spybot Search & Destroy” to find & delete the vestiges if found.
To do it via the Start menu:
- Click the Start, and enter “regedit” to open the Registry Editor.
- Delete the following folders:
HKEY_CURRENT_USER\Software\Safer Networking Limited\
HKEY_LOCAL_MACHINE\SOFTWARE\Safer Networking Limited\
- On the navigator, click Edit > Find…, and enter “Spybot Search & Destroy” to find & delete the vestiges if found.
6. Restart your PC to take effect.
- Then check whether the program has been completely removed. But if you have installed Adaware in compatible mode, reboot is not required.
Remove Spybot Search & Destroy with A Reliable Tool
There are many tools you can easily get on the Internet, the hard part is which to choose. If you kinda lost your way, take my preparation – a good general-purpose tool that is available in most versions of Windows and works with types of programs:
1. Click the blue download button on the page to download & install Special Uninstaller, then run it.
2. Find & select Spybot Search & Destroy in the Programs list, and click Run Uninstaller.
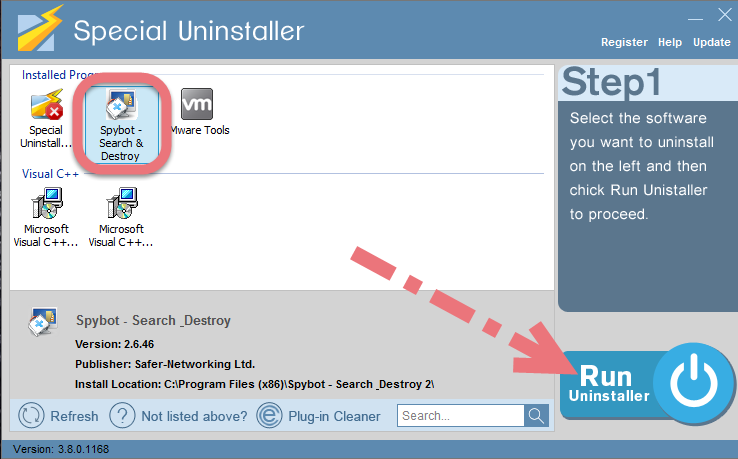
3. Follow the prompts to proceed with the removal, then click Scan Leftovers when you’re able to. Keep all the related items checked, and click Delete Leftovers to fully remove Spybot Search & Destroy.
To check whether you’ve done the removal well, click “Back” You will be brought back to the list, where you can see all the currently installed programs on the system, then just do the same to remove other unwanted programs from your PC. Watch this video to quickly know the whole process:
How should I uninstall Skype? How should i uninstall DVD Shrink?
Leave a Reply