Today I’m writing solutions for you to completely uninstall NTI Backup Now EZ – a program that many users don’t know how to remove lately.
Since avoiding data loss is very important than ever these days, backup applications have been designed for people in need. NTI Backup Now EZ is one of them. It can protect your photos emails, music & video collections, and other valuable data files from malicious attacks, computer hardware failure, or mistaken deletion. Other details include:
Official site: www.nticorp.com
Installation folder: C:\Program Files\NTI\NTI Backup Now EZ\
Estimated size: 2.51MB
Program Executable: C:\Program Files\NTI Backup Now EZ\BackupNowEZSvr.exe
To uninstall NTI Backup Now EZ, you can take the following solutions with speciic steps listed.

How to Uninstall NTI Backup Now EZ with Much Convenience?
The answer is to use an efficient tool takes care of all the necessary jobs for you. I believe this will save a lot of time:
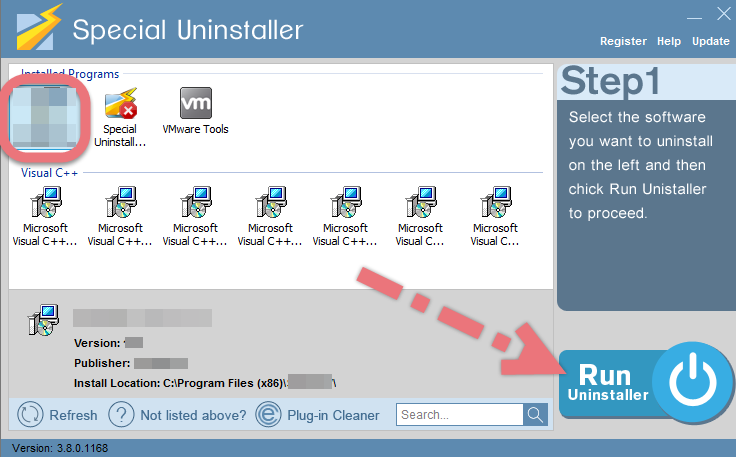
1. Click the green Download button to install Special Uninstaller.
2. Run it and you will see the list of all the programs currently installed on your machine > Locate the NTI Backup Now EZ icon, select it and click on the blue Run Uninstaller button.
3. After a few seconds, it will give you the option to Scan Leftovers (cleaning out the keys from Windows Registry), click it.
4. Keep all items (related files and leftovers in the Registry) in the new list ticked, hit the green Delete Leftovers button to completely uninstall NTI Backup Now EZ.
Clicking Back will fresh the programs list, so that you can check whether your target has been eliminated. If the removal is successful, you can perform the same steps to uninstall other programs you wish to remove. Watch this video demonstration and you’ll know how to use Special Uninstaller:
How to Uninstall NTI Back Now EZ on Your Own?
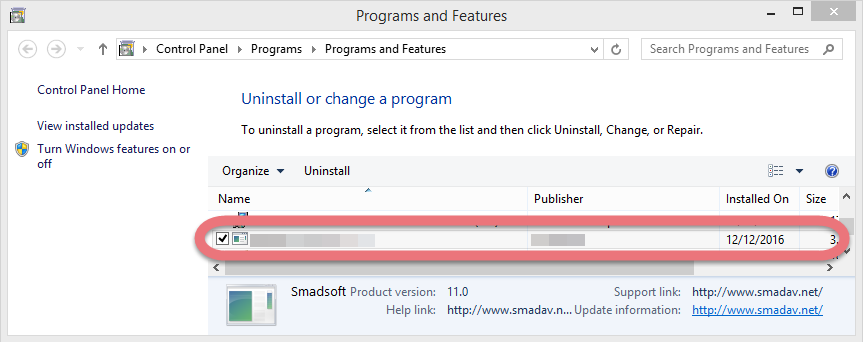
1. Open Programs and Features to Uninstall NTI Backup Now EZ
> Right-click on the Start button in the bottom-left corner of your screen, and select Programs and Features.
> Locate the unwanted (maybe outdated) NTI Backup Now EZ item in Uninstall or change a program list (Windows programs manager or Currently install programs list), which should have the option to change, repair or uninstall the program.
> Double-click NTI Backup Now EZ the start the removal.
> Its default uninstaller will be activated with a pop-up window. Provide confirmation to proceed, and wait for it to finish the job.
> When it tells you “The product was successfully uninstalled, blah blah blah…” or something like that, it’s done, and you can go to the next part.
2. Uninstall NTI Backup Now EZ from the Windows Registry
Most users skipped this step because they didn’t know how to do it, while this will actually lead to the accumulation of junks. So every time you’re trying to completely delete a program, don’t forget to clean out its entries. Reading this part may also help when you need to deal with another program someday.
> Press and hold Windows key + C to open the charms bar, select Search, type regedit in the search box, and hit the Enter key on your keyboard to open the Registry Editor.
> Then the Registry Editor is now presented with a new window. Delete everything under HKEY_CURRENT_USER\software\NTI\
> To search for other possible remaining files, click Edit > Find… on the navigator, and enter “NTI Backup Now EZ”. If found, delete it to completely uninstall NTI Backup Now EZ.
> Restart your computer to take effect, and you may check whether the removal has been done successfully.
How to Back up and Restore Your PC?
In case you’re wondering “How am I supposed to create backups for my PC without using NTI Backup Now EZ?” (Please remember not to back up files to the same hard disk that Windows is installed on.)
Back up
1. Right-click the Start button, and select Control Panel > System and Maintenance > Backup and Restore.
2. Do one of the following:
- If this is the first time you do this, select Set up backup.
- If you’ve created a back before, you can create a new by selecting Back up now/Create new, full backup.
Make a system image
1. Right-click the Start button, and select Control Panel > System and Maintenance > Backup and Restore.
2. Select Create a system image in the left pane.
For more methods of Windows backup & restore, you can visit here.
How to remove ScanGuard? How to remove Smadav Antivirus 2016?
Leave a Reply