Don’t be surprised if you failed to uninstall Security Essentials in Windows, because it’s a bit harder than common programs to remove.
For a PC running an older version of Windows 7, you can download Microsoft Security Essentials for protection. Windows 8, Windows RT, Windows 8.1, Windows RT 8.1, and Windows 10 all have Windows Defender – a built-in protection against malware. You can’t use Microsoft Security Essentials, but you don’t need to. Windows Defender is already included and ready to serve you.
The following content is teaching you how to correctly uninstall Security Essentials in Windows.

How to Regularly Uninstall Security Essentials in Windows?
You must be logged on to Windows by using a user account that is a computer administrator to complete the removal. If this is your personal computer, you’re likely already logged on by using an administrator account. If this is a computer that is part of a network, you might have to ask the system administrator for help. To verify that you’re logged on to Windows by using a user account that is a computer administrator, visit the Microsoft website: http://support.microsoft.com/gp/admin
Then you’re suggested backing up the registry first, because serious problems might occur if you modify the registry incorrectly. So please make sure you follow every step carefully. If any problem occurs, you can restore the whole registry from the backup. To back up the registry:
1. Click Start, type regedit in the text box and select regedit from the results.
2. In the navigation pane of Registry Editor, click File > Export…

Now let’s move on to uninstall Security Essentials.
Step One: Shut down Security Essentials.
Quit the Security Essentials program from running in the background no matter what. It may not be necessary towards the removal of some programs, but just in case.
Step Two: Uninstall Security Essentials by activating its built-in uninstaller (2 Options).
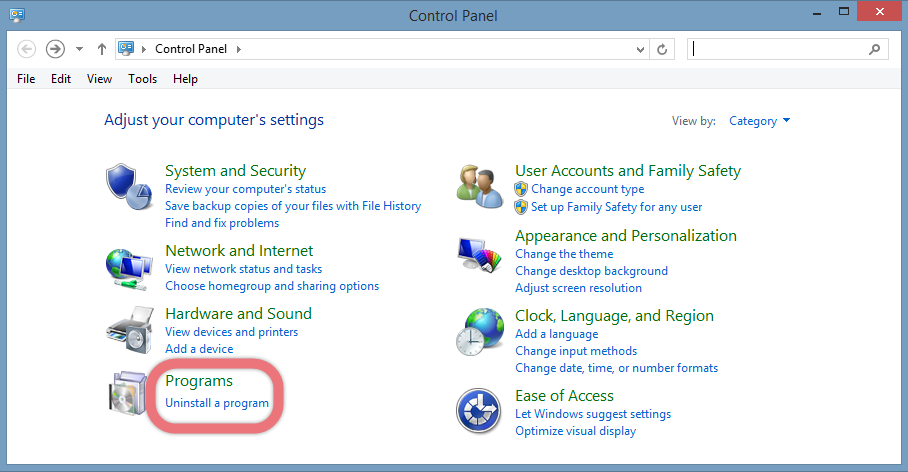
Option 1: Click on the Start button, select Control Panel, and click Uninstall a program under Programs. Now you should be looking at the list of Add/Remove Programs, find and double-click Security Essentials to start the removal.
Option 2: Open the File Explore by clicking the folder icon on the Taskbar, and navigate to this location: X (the hard drive you installed the program on):\Programs Files (x86)\Microsoft Security Essentials\, double-click the executable file name unins000.exe to activate its default uninstaller.
Step Three: Confirmation.
Follow the on-screen instruction to confirm the uninstall, and wait for the built-in uninstaller to finish its part. Then we get to clean out the lingering files.
Step Four: Open the Windows Registry Editor.
Click the Start button, select Run, and enter “regedit” in the input field to open the Registry Editor.
Step Five: Delete the remaining registry subkeys to fully uninstall Security Essentials from your PC.
See if you can find the following subkeys:
- HKEY_LOCAL_MACHINE\Software\Microsoft\Windows\Current version\Uninstall\Microsoft Security Essentials
- HKEY_LOCAL_MACHINE\Software\Microsoft\Microsoft Security Essentials
- HKEY_LOCAL_MACHINE\SOFTWARE\Microsoft\Microsoft Antimalware
- HKEY_CLASS_ROOT\Installer\Product\Microsoft Security Essentials
- HKEY_CLASS_ROOT\Installer\Product\Microsoft Antimalware
- HKEY_CLASS_ROOT\Installer\Product\Microsoft Antimalware Service
Successively right-click on each of them and select Delete.
Then on the navigator of Registry Editor, click Edit > Find… > search for “Security Essentials” > Delete the file (s)/folder (s) if found.
Step 6: Restart your PC to take effect.
Then check your system tray (right end of the Taskbar) and Task Manager (hit Ctrl + Alt + Del to open), if you don’t see Security Essentials persist then the removal was successful.
Super Easy Way to Uninstall Security Essentials on Your PC
This method applies to all the popular Windows systems, saving troubles and possible risks during the conventional removal. The following short video will show you how it works to remove a program in Windows:
Then here are the steps:
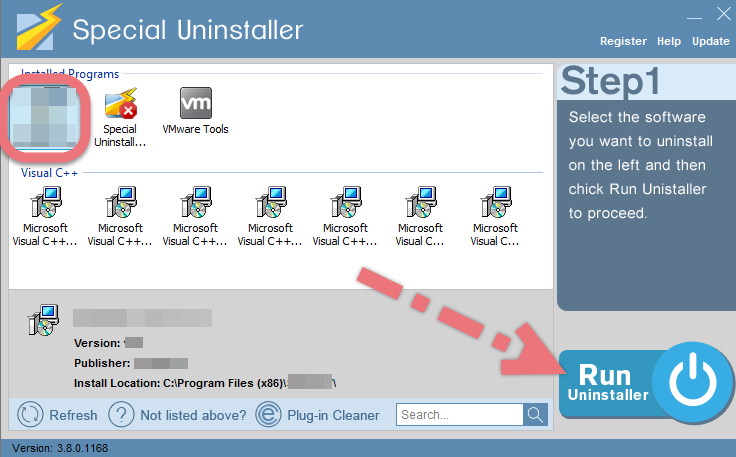
1. Download & install Special Uninstaller.
Click any of the blue download buttons on the page to download & install Special Uninstaller, then run it.
2. Uninstall Security Essentials.
Select Security Essentials in the Programs list, and click Run Uninstaller, follow the on-screen instructions of proceed and confirm the removal.
3. Delete the registry entries.
Click Scan Leftovers, and you will see a list of deleting files and registry entries (leftovers) of the program. You can review the list for details including their names and locations, then hit Delete Leftovers to fully uninstall Security Essentials.
Clicking Back will bring you back to the list of currently installed programs, so that you can check whether the uninstall was successful.
After the successful removal, if you need to reinstall Security Essentials for later use, download it from Microsoft’s official website to avoid malicious traits. For any questions you want to ask about this removal, leave comments below. We’ll read them and get back to you with a proper answer as soon as possible.
I need to remove Spybot Search & Destroy I need to remove Skype
Leave a Reply